Facebook Twitter Instagram
    Stock Photo News
    • Shutterstock Launches The Create Fund for Artists to Produce Current Content
    • Dreamstime Raises Royalty Rates by 10% to Aid Artists During Covid19 Pandemic
    • Shutterstock Updates Contributors Royalty Rates – New Download-Based Levels
    • Shutterstock’s Contributor Earnings Report is Out: $1 Billion in Royalties Paid!
    • Creating Stock Video vs Photos: 5 Reasons Why It’s Easier Than You Think (Including Higher Royalties)
    • Shutterstock Contributor App Now Enables Mobile Sign-Up
    • How to Use Google Trends to Identify Profitable Stock Photo Trends
    • How Much Photographers Earn: Jim Pickerell’s Survey Results are Here
    My Stock Photo
    • Home
    • News
    • Guides
      • Webinars
    • Stock Agencies
      • Microstock Agencies
    • Tools & Software
    • Photography
    • Stories
      • Interviews
    • Mobile Stock
    • Contact
      • About
      • Privacy Policy
    My Stock Photo
    You are at:Home»Microstock News»12 steps microstock workflow

    12 steps microstock workflow

    10
    By Amos Struck on July 9, 2009 Microstock News

    This is my current workflow – in 10+2 steps – for microstock photo contribution:

    1. Shooting in RAW format… of course, To Be Improved 😉
    2. Downloading images from cards and backup them (2 PCs, 1 external HD, 1 online service)

    3. Choosing which photos to prepare (ACDSee browser)
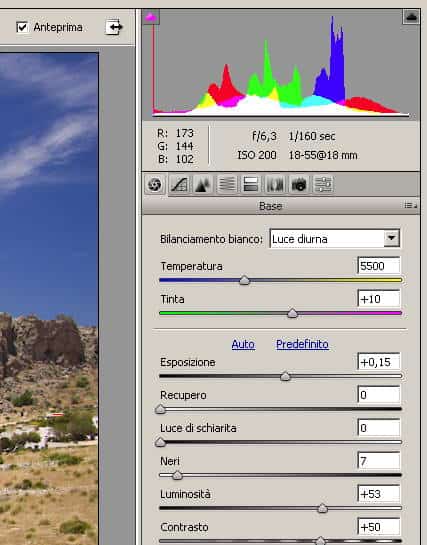
    4. Process selected RAW files with CameraRaw

    • white balance check
    • levels adjustment
    • sometimes a bit of saturation
    • lens correction/aberration if necessary
    • rotation and cropping if necessary

    cameraraw setting

    5. Editing in Photoshop (mode 16 bit/channel)

    • checking levels again
    • noise reduction (generally only skies and dark areas)
    • corrections (patch, clone,…)
    • sometimes sharpening using high-pass filter method (duplicate layer, apply high pass filter, change blend mode in “overlay”, trim down the “opacity” of the layer to let you say “it's enough”)

    6. Compiling metadata fields trying to use templates (Photoshop or Bridge)

    • title
    • description
    • keywords (a little help from picNiche and/or Arcurs keywording)
    • location city/country
    • author/copyright notice

    7. Saving in PSD format (16 bit) for possible further modifications and re-uploading
    8. Changing in 8 bit/channel mode to save final JPEG format files (remember to backup your final JPG)
    9. Uploading to iSyndica to distribute images to 15 agencies. Exceptions are iStockphoto (uploading via deepmeta) and another couple of sites via web http (such as Snapixel)

    isyndica-agencies

    10. Connecting to all the sites for the final categorization and submission

    Bonus Steps

    11. Hoping photos will be accepted and trying to learn from the rejections
    12. Hoping accepted photos will sell a lot 🙂 and monitoring using picNiche toolbar and Lookstat

    Forgotten anything important?
    Related posts:

    The list of Microstock Acronyms and Terms
    How to sell stock photos - webdesigner depot
    Fotolia launches Operation Level Ground to attract Artists
    Share. Facebook Twitter Pinterest LinkedIn Tumblr Email
    Amos Struck
    • Twitter
    • LinkedIn

    I write about the stock photo and microstock industry since 2006 on my several online-magazines. My goal for MyStockPhoto is to teach photographers and stock photographers how to sell more photos and earn money with their photography hobby.

    Related Posts

    Shutterstock Launches The Create Fund for Artists to Produce Current Content

    Dreamstime Raises Royalty Rates by 10% to Aid Artists During Covid19 Pandemic

    Shutterstock Updates Contributors Royalty Rates – New Download-Based Levels

    10 Comments

    1. Mila on July 9, 2009 4:22 pm

      Pregare che il dollaro non scenda troppo? 😛

      Reply
    2. mystockphoto on July 9, 2009 4:26 pm

      … oppure di vendere un sacco in euro 😉 ciao Mila, grazie

      Reply
    3. luissantos84 on July 9, 2009 4:34 pm

      eheh very nice.. i have never used photoshop to correct anything.. i just shoot on jpg and upload… 🙂 i just use gimp to crop sometimes..!

      cheers and good month

      Reply
      • Alex on October 13, 2009 11:07 am

        There is a lot to be said for keeping it simple!

        Reply
    4. AUGUSTO on July 9, 2009 4:45 pm

      Great post! I also have my workflow, which is quite diferent as I work with illustrations..
      cheers

      Reply
    5. mystockphoto on July 9, 2009 5:22 pm

      Thanks Luis & Augusto!
      Cheers,
      roberto

      Reply
    6. Cristina on July 14, 2009 12:08 pm

      E' un lavorone!!!
      Bel post!
      Ciao. Cris

      Reply
    7. aletermi on August 13, 2009 12:09 pm

      Hi Roberto, great post as usual. My worklow is similar but I use ViewNx / Capture Nx in step 3,4,5 because they work very well with NEF. I use Photoshop only for clone tool and objects isolation. Ciao.

      Reply
      • @mystockphoto on August 13, 2009 12:15 pm

        Ciao Ale, U Point technology… fine!
        Thanks for the continuous support.
        Best,
        roberto

        Reply

    Leave A Reply Cancel Reply

    Recent Posts
    December 11, 2020

    Shutterstock Launches The Create Fund for Artists to Produce Current Content

    June 1, 2020

    Dreamstime Raises Royalty Rates by 10% to Aid Artists During Covid19 Pandemic

    May 26, 2020

    Shutterstock Updates Contributors Royalty Rates – New Download-Based Levels

    December 10, 2019

    Shutterstock’s Contributor Earnings Report is Out: $1 Billion in Royalties Paid!

    April 11, 2019

    Creating Stock Video vs Photos: 5 Reasons Why It’s Easier Than You Think (Including Higher Royalties)

    Want to learn how the Pros sell their photos online?

    Signup for our weekly free newsletter!Click Here to get Free Help!
    © 2022 ThemeSphere. Designed by ThemeSphere.

    Type above and press Enter to search. Press Esc to cancel.